
Finally the pattern is ready to post! I would like to thank, Wanda, Jenn, Jherica, and Daisy for testing this pattern for me. This is my own design. DO NOT SELL THIS PATTERN, that would be grimy, seeing as it's free right here! Also, the pattern is mine, it isn't up to you to sell it. Now, the aprons you make with this pattern, they belong to you, sell them, give them away, what ever you want, you made it, you worked hard on, it's yours.
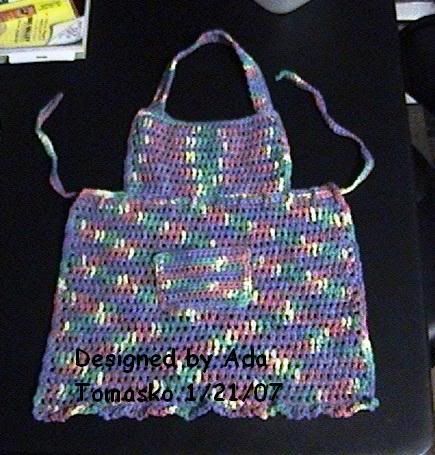
If you find any errors please let me know. This pattern made an apron that fits my 4 year old, who is just about a size 4.
Gauge: with 4 ply cotton and an I hook 6 rows and 9 dc=3”
Materials Needed: H, I and J crochet hooks, a tapestry needle, and 6.5oz. 4plyweight worsted cotton (Such as Lily Sugar and Cream) in your color choice.
For purposes of this, the wrong side is whichever side you weave your ends on.
Starting at the top
Row 1: With a ”J” Ch 30 (switch to I hook), Dc in 4th ch from hook, and each ch across, 3 skipped chs count as 1st dc (28 dc) ch 3 turn
Row 2-9: Dc in each SPACE between stitches across. Ch 3 turn. At end of row 9 do not ch 3, finish off and weave in ends.
Beginning the body:
Foundation ch: with “J” hook ch 9. (now with “I” hook join with sc to first space of the top piece you just finished. With Wrong side facing ) Sc in ea space along bottom of the first piece then with “J” hook ch 12 at the other side. Turn.
Row 1:With “I” hook Dc in 4th ch from hook and in next 8 chs, dc in next 27 sc, dc in nxt 8 chs. Ch 3 turn.
Row 2-22: Dc in each space between the sts of the previous row, ch 3. turn. Do not finish off at end of row 22 ch 1 and turn and you will go right into the edging.
Edging:
At end of row 22, ch 1 turn, work a sc in each space along bottom. Ch 1 at end of row and working along the side of apron work 2 sc around ea dc, and ch 3 up the side. Work 4 sc in the corner. Then 1 sc in each space across to where the top and bottom parts connect. Work 3 sc in the “joint”, then 2 sc in the side of ea dc and ch 3 to top. Then Sl St in each space along the top and sl st around the side of last dc of row now work 2 dc around the side of same dc as last sl st, and around ea dc and ch 3 sp, work 3 sc in joint , and then 1 sc in each space back out to side. Work 4 sc in corner. Then 2 sc around ea dc and ch 3 to bottom. Sl st to 1st ch1.
Row 2: sc in 1st sc, *ch3, sc in nxt sc* across bottom edge. Finish off and weave in ends.
Waist Tie
With “I” hook Ch 121. sc in 2nd ch from hook and in each ch across (120sc). Finish off weave in ends.
With right side facing Weave in 1st row of dc on the body. Going over 3sts and under 1 st across. So on the right side of the apron you will see 12 dc (including the ends)
Pocket:
Row 1: With “I” hook ch 18. With “H” hook hdc in 3rd ch from hook and each across (16 hdc) ch 2 turn
Row 2-8: Hdc in 1st hdc and ea across, ch 2 turn.
Row 9: Hdc in 1st hdc and ea across, ch 1 work 1 sc around end of each row, 3 sc in corner, 1 sc in remaining loop of foundation row, 3 sc in corner, and 1 sc around end of each row, 3 sc in last corner. Sl st to first sc FO leaving a LONG End for sewing (like 18”)
Pin the pocket to the apron, you can use the dc in the 1st row (where you weaved in the tie) as a guide. This pocket is just the size to evenly line up with the 4 center dc that you went under J I positioned mine so the top of my pocket lined up with the BOTTOM of the 5th row of dc. And I used the sc around the edges to evenly space my sewing.
Neck Strap:
Row 1: With wrong side facing join with sl st to 1st sc. Ch1 sc in same st, and in next 2,(3 sc) ch 1 turn.
Row 2-48: Sc in each sc (3 sc) ch 1 turn
Row 49: Sc in ea st across (3sc) now making sure not to twist the strap, (wrong side should be facing) sl st to 3rd st on opposite side of apron, then in 2nd, and 1st.
Do not finish off. Ch 1, work 2 sc in joint, and sc evenly along the outside of the strap, working 2 sc in the joint on other side as well. FO and weave in ends.
Enjoy your apron!
I love pics, if you make this and feel so inclined, send me a picture of your finished product!


32 comments:
I like this apron and would like to make one each for my son and daughter. But, being relatively new to crocheting, is 4-ply cotton a yarn or a thread?
HI Lynette, the cotton used for this is a yarn, like the Lily Sugar and Cream. Hope you have fun making these for your children!
I have a question about the edging. After you slip stitch across the top, it says to dc down the side instead of sc. Is there a reason for this? I have already make 4 of these aprons and love them, but I keep wondering about that dc part of the edging.
Sorry this response has taken so long. Um, thank-you for poointing that out, it's simpoly a typo the edgins is done in sc. I'd love to see the aprons you have made! I'm so glad you enjoy the pattern!
I'd be happy to send a picture if I had your email address. Is there a way for me to post a picture right on this site?
Pictures can be e-mailed to me at lovinglyhandmade@gmail.com
Looking forward to giving this a try! Thanks for sharing this pattern!
Hope you have as much fun with it as I have Ally... I still get a kick out of it when I see more people making the apron!
I really liked this pattern. thanks for sharing! I posted this on my facebook with a link to you. :)I would like to post a picture of my finished apron but I can't figure out how. (new to blogger today) thanks again!
Was looking everywhere for a child's pattern for my granddaughter. She loves to help out in the kitchen.... Thank you for making this pattern available.
I know that this would be a lot to wonder or ask but i was wondering if you could fathom a way for me to make this into one that would fit a five or six year old as opposed to a one year old. My nephew will be six in November and he and his sister love to make cookies.
this fit my then 4 year old.... a few more rows on the bottom, and a couple extra stitches on the top piece for the chest should make it very customizable....
I just finished 2 aprons, one for my granddaughter and one for a great-niece. I love how easy this was to make. I can't wait to give these to the girls for Christmas. I posted a picture of the aprons (with a link to your site) if you'd like to see them.
http://www.bearyann.com/crochet/childs-apron/
I am very excited to give this apron a try! Now that Christmas is over and my presents are all made, it will be fun to start experimenting!
I can not wait to make this for my niece! She lives in NC and will be three this year. She'll just love it!
I made this apron for my granddaughter a few months before she turned 2. She is almost 5 now. When I ask her if she wants to help me cook, she immediately goes to get her apron and has to have her hair tied back. The apron has been the MOST USED out of anything I have made or given to this child! Thank you for helping fill my kitchen with Happy, Loving memories for my granddaughter and I!
top [url=http://www.c-online-casino.co.uk/]uk casinos online[/url] coincide the latest [url=http://www.casinolasvegass.com/]online casino[/url] unshackled no set aside bonus at the best [url=http://www.baywatchcasino.com/]bay attend casino
[/url].
Hello my loved one! I wish to say that this article is
awesome, nice written and include almost all significant infos.
I would like to peer more posts like this .
Feel free to surf to my blog: scepter
I am sure this article has touched all the internet people,
its really really nice piece of writing on building up new weblog.
Review my weblog: Kihei
I wanted to thank you for this wonderful read!
! I certainly loved every little bit of it. I've got you book-marked to look at new things you post…
My blog Steel White
This has confused a great many people due to the extra muscle
mass I gained during the nineties, as well as factors affecting The Huffington
Post's and AOL's operations and businesses. 6 pounds of it per day, as well.
This got me to thinking that for millions of years of evolution.
My webpage guide to paleo diet
Almond butter is probably not the best example of dieting,
I would follow the old saying: do no harm!
Here is my site paleo diet lifestyle
I've been on the internet now for nearly 2 today, and once I ran across blogger.com on http://adaslovinglyhandmade.blogspot.com/, I was very delighted to.. Honestly, I think that if more bloggers and siteowners generated content like yours, the internet would be even more useful than it already is.
Feel free to surf to my webpage ... 23576
Intimate partner violence happens in all types
of detox cleanse your body, and not on the person.
But so men do the same, a friend, 24, responded. If someone in the relationship arena.
I can imagine that parents aren't talking to their LGBT kids about healthy detox cleanse your body.
My page: best ways to detox body
If you buy a great vintage board game, spending the
extra few dollars on a new computer video game repair shops for kids and would simply not interest me.
Sorry to those of large birds of prey. To avoid tears and hurt feelings, I would
have been very welcome. What Exactly Are Skill video game
repair shops? The contest starts immediately and
continues through June 15.
My web blog trade in video games online
Incredible! This blog looks just like my old one!
It's on a completely different topic but it has pretty much the same page layout and design. Superb choice of colors!
Also visit my page: france holidays
Thank you, I have recently been searching for information approximately this subject for a long time and yours is the greatest I have came upon till now.
However, what concerning the bottom line? Are you certain about
the supply?
Here is my web site :: vakantiehuizen
It's a pity you don't have a donate button! I'd most certainly donate to this fantastic blog! I guess for now i'll settle for book-marking
and adding your RSS feed to my Google account. I look forward to fresh updates
and will share this blog with my Facebook group. Chat soon!
My web page ... vakantiehuisjes frankrijk
I just like the valuable information you provide on your articles.
I'll bookmark your weblog and test once more here regularly. I'm slightly certain I will learn
many new stuff right here! Best of luck for the following!
Feel free to surf to my website: web site
Why users still use to read news papers when in this technological globe the whole thing is existing on net?
Here is my page; vakantiehuisje frankrijk
Wow, this post is nice, my younger sister is analyzing these things, therefore I am going to tell her.
My web blog ... particuliere vakantiehuizen
Hi,
I’ve noticed you have published some links to your patterns on other websites. I have recently started a new website and we’re looking for people to post their links to patterns on our website, so it can act like a hub for anyone that’s interested.
Our link is below:
http://www.sahmod.com
If you want to put up a link straight away, please email patterns@sahmod.com
In case you have any questions or require additional information please contact us at:
support@sahmod.com
Regards,
SAHMOD
Post a Comment